With the latest release of UD6 we have incldued a sneak peak at our support for tigher integration between Change Management and Uniface, with particular support for Uniface 10 and GitHub.
We've initially focussed on Uniface 10 integration because there is no 'additional menu' in Uniface 10, but it works just as well with Uniface 9.
There are two elements to this integration:
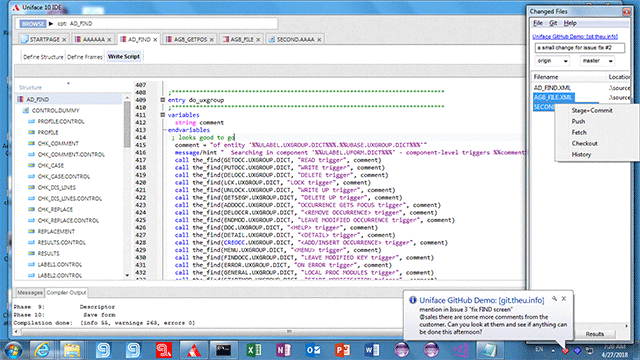
Right click the UD6 chessboard icon and select 'changed files' to open the floating window.
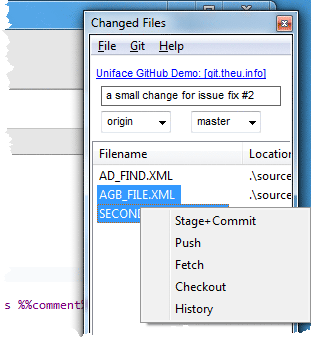
Currently this window shows the 'recently changed' files (from this UD6 session). Future suggestions for expansion include:
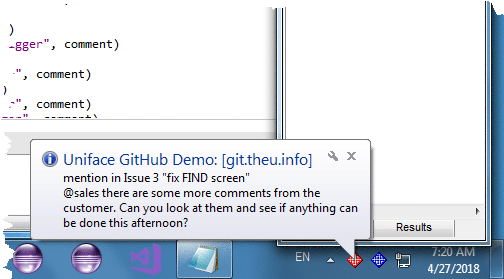
The chessboard will automatically display notifications from GitHub while UD6 is running.
Future suggestions for expansion include:
The setup is different for GitHub Enterprise where you have an on site GitHub server, or the cloud version of GitHub which uses github.com domain.
To configure the GitHub integration you need to specify the settings in the ASN file
collaborate github port 443 host 172.16.20.129 bearer d12ae72d99867b3ac08f071664b02b99c5528761 exe "git.exe" install "C:\Program Files\Git\bin" comment "@sales default comment" url /api/v3/notifications force-poll 3 repo origin branch master title Uniface GitHub Demo:
collaborate github port 443 host api.github.com bearer %gitbearer% exe "git.exe" install "C:\Program Files\Git\bin" comment "@sales default comment" url /notifications force-poll 3 repo origin branch main title Uniface GitHub Demo 2:You can use .gitattributes files to configure Git and GitHub Desktop
to recognise the correct encoding for UD6 XML files.
The 'gitattributes' USYS$UD6_PARAMS setting will force UD6 to generate these files automatically as XML files are created or updated.
here is a brief guide to the GitHub integration settings from USYS$UD6_PARAMS.
collaborate github - this is the main setting - all following settings are dependant, eg: collaborate github port 443 and collaborate github exe "git.exe"
port 443 - this is the port that the GitHub server is operating on
host 172.16.20.129 - this is the IP address or hostname that the GitHub server is available at
bearer d12ae72d99867b3ac08f071664b02b99c5528761 - this is your login token. It is available on your GitHub profile page - copy and paste it to your ASN.
exe "git.exe" - the name of the git executable on your PC
install "C:\Program Files\Git\bin" - install location of Git on your PC
comment "@sales default comment" the checkin comment to use if the comment field is blank in the floating panel
url /api/v3/notifications - the notification url on your GitHub server
force-poll 3 - force polling of the GitHub server for notifications every n seconds. Not recommended (by default the GitHub server will supply a recommended polling interval which will be used).
repo origin the default git repository
branch master the default git branch
title Uniface GitHub Demo: - if provided, this must be the last setting
You will require a GitHub personal access token: https://help.github.com/articles/creating-a-personal-access-token-for-the-command-line
Since this token will be different for each developer, a typical case would be to set this in the USER environment variables on the PC, then use:
USYS$UD6_PARAMS=collaborate github bearer %gitbearer%
UD6 does not prompt for Git usernames and passwords, so you should use a credential manager. During install select the Git Credential Manager:
https://github.com/GitCredentialManager/git-credential-manager
After installing Git client, we need to authenticate to GitHub:
https://docs.github.com/en/get-started/getting-started-with-git/caching-your-github-credentials-in-git?platform=windows#git-credential-manager
The next time you clone an HTTPS URL that requires authentication, Git will prompt you to log in using a browser window. You may first be asked to authorize an OAuth app. If your account or organization requires two-factor auth, you'll also need to complete the 2FA challenge.
create a new repository on the command line:
echo "# demo-02" >> README.md
git init
git add README.md
git config --global user.email “user@YOUR-DAOMAIN.com"
git commit -m "first commit"
git branch -M main
git remote add origin https://github.com/youracct/demo-02.git
git credential-manager github login
git push -u origin main
... at this point a login window for github should appear ...
*1) sign in with a browser
  2) sign in with a code
| $Revision: 1.10 $ $Date: 2024/04/07 11:19:46 $ | [go to top] |